by Richard Butts
Note from Shawn
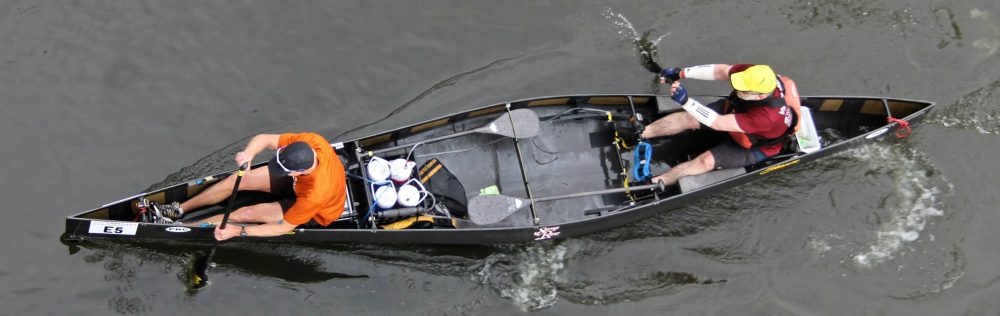
Here in the Northern Hemisphere, we’re enjoying the twilight of another paddling season, with colder weather and hard water (aka, ice) not too far away. Many of us who can’t relocate to warmer Winter climes will transition to other forms of training, with Nordic skiing topping many paddlers’ off-season list. And some of us will move to indoor training on paddling ergometers. While ergs can do a fair job of simulating the paddling stroke and the speed-dependent drag of our hulls, they lack one key attribute: roll instability. Frankly, they’re like paddling on a dock. So how can we hack our ergs to mimic the on-water experience more closely when our lakes, streams, and rivers ice over?
In this post we’re reprinting an article from the Spring 2011 Competitive Paddler by fellow engineer Richard Butts, who has graciously given me permission to share it.[1] Richard shows us how to design and build rockers for the Paddle One® erg[2] that simulate the metacentric height of a paddled craft on the erg. The design can be extended easily to the Concept 2 / Paddlesport Training Systems erg combo, and probably to other paddling ergometers as well. So, if you’re looking for a project this weekend – or any time before the snow flies – this is a fun one that may help keep your core and balance in tune during the Winter months.
So, take it away, Richard…
Introduction
The Paddle One machines are terrific for exercising the strength and coordination used in canoe and kayak paddling. I own an older Paddle One canoe version and the arm, torso and leg motions feel very similar to real paddling. A significant difference between the Paddle One and real paddling is the inability to lean the ergometer. This article gives information about designing and building add-on rockers that let you lean the erg while training.
My interest in being able to lean the paddling machine is motivated by three observations:
- Coordinated movement of the hips, arms, legs, and torso is important for balancing and steering a canoe, so training balance is appropriate.
- I lack symmetry when it comes to leaning right vs. leaning left. Efficient paddling requires symmetry, and I notice mine could be better. The leaning paddling machine allows me to work on discovering the joints, ligaments, motions, coordination, etc. that limit my symmetry and give me the opportunity to improve.
- With the machine free to lean it is even more fun to use!
The adaptors shown in Fig. 1 are easily made from 2” x 4” dimensional lumber and ¼” plywood. Note that if you build and use the adaptor you will be able to fall off the machine if you lean farther than your skill allows you to recover. You are responsible for safety while making and while using it.
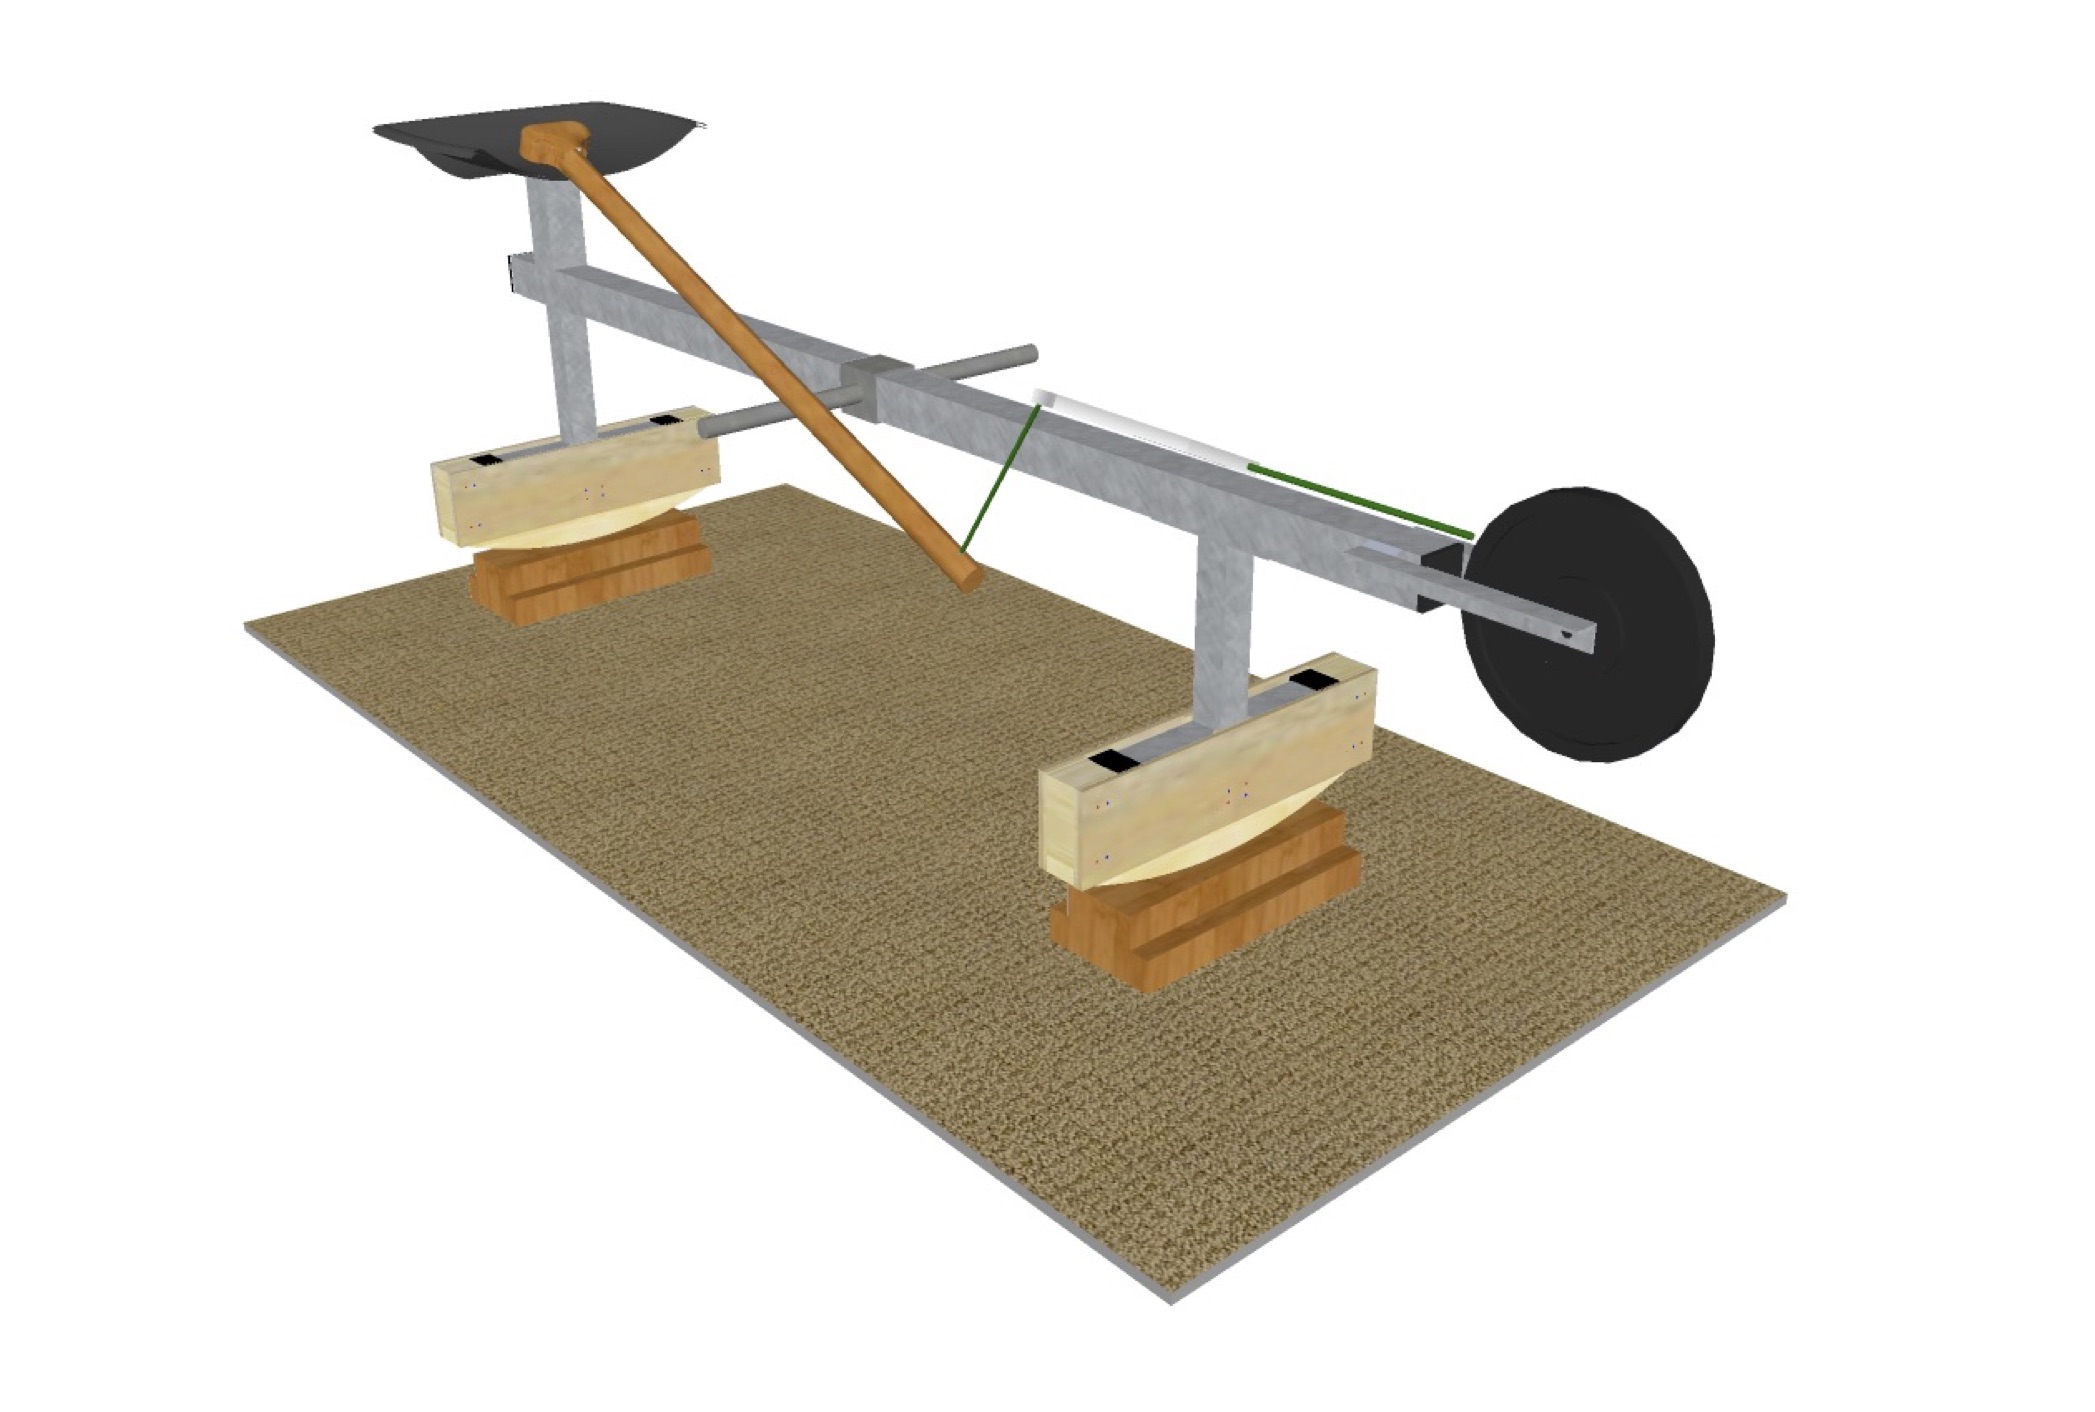
Figure 1: Paddle ergometer and rocker adaptors concept.
My development of the adaptor took several iterations. The final version shown here is easy to make, its performance is easy to understand, and it’s easy to install. The rockers offer a ‘slip-on’ design. There is no need for clamps or fasteners to hold the adaptor onto the Paddle One.
The Design
Determining an appropriate radius for the rocker is made easier by recognizing three elements of the lean:
- When the machine and rocker are leaned the rocker rolls on the floor. The rocker does not pivot about a fixed location.
- When the rocker rolls on the floor the center of the rocker’s radius is always directly over the rocker’s contact point with the floor.
- When a person returns to the center position after leaning the machine, they have made the return happen by keeping their combined (machine and self) center of gravity between the neutral (i.e., no-lean) position and the vertical line containing the rocker’s center. When a person leans the machine and remains balanced, they have moved their combined center of gravity on the vertical line containing the rocker’s center. When a person leans the machine and uncontrollably continues to lean, they have moved their combined center of gravity outboard of the vertical line containing the rocker’s center.
The critical radius for stability is the one which places the rocker’s center at the seat height, as illustrated in Fig. 2. A center point above the seat height will be most stable. A center point below the seat height will be least stable. This is true in part because human anatomy and the limits of our ability to tilt the pelvis relative to the torso, and our ability to dynamically manage that tilt to achieve balance.
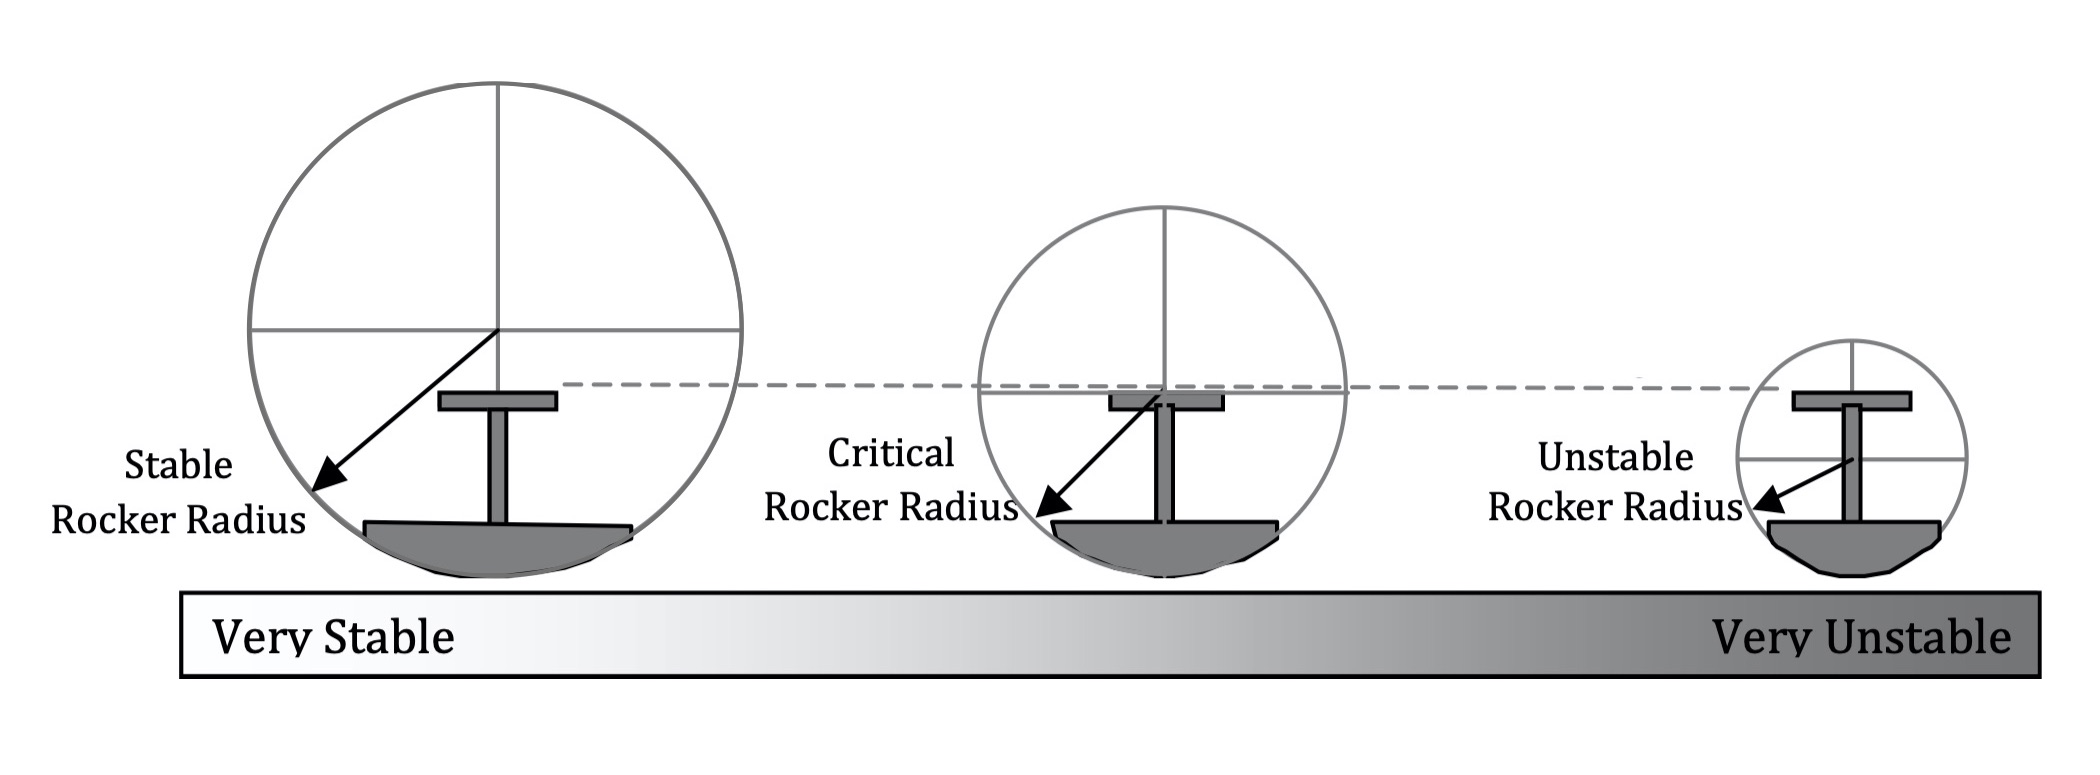
Figure 2: Rockers radius and stability.
The diagram on the left of Fig. 3 illustrates the stabilizing effect caused by choosing a rocker radius larger than the seat height. The diagram on the right of Fig. 3 illustrates the de-stabilizing effect caused by choosing a rocker radius smaller than the seat height. [Shawn’s note: See Part 19: Roll Your Boat for even more information about roll stability.]
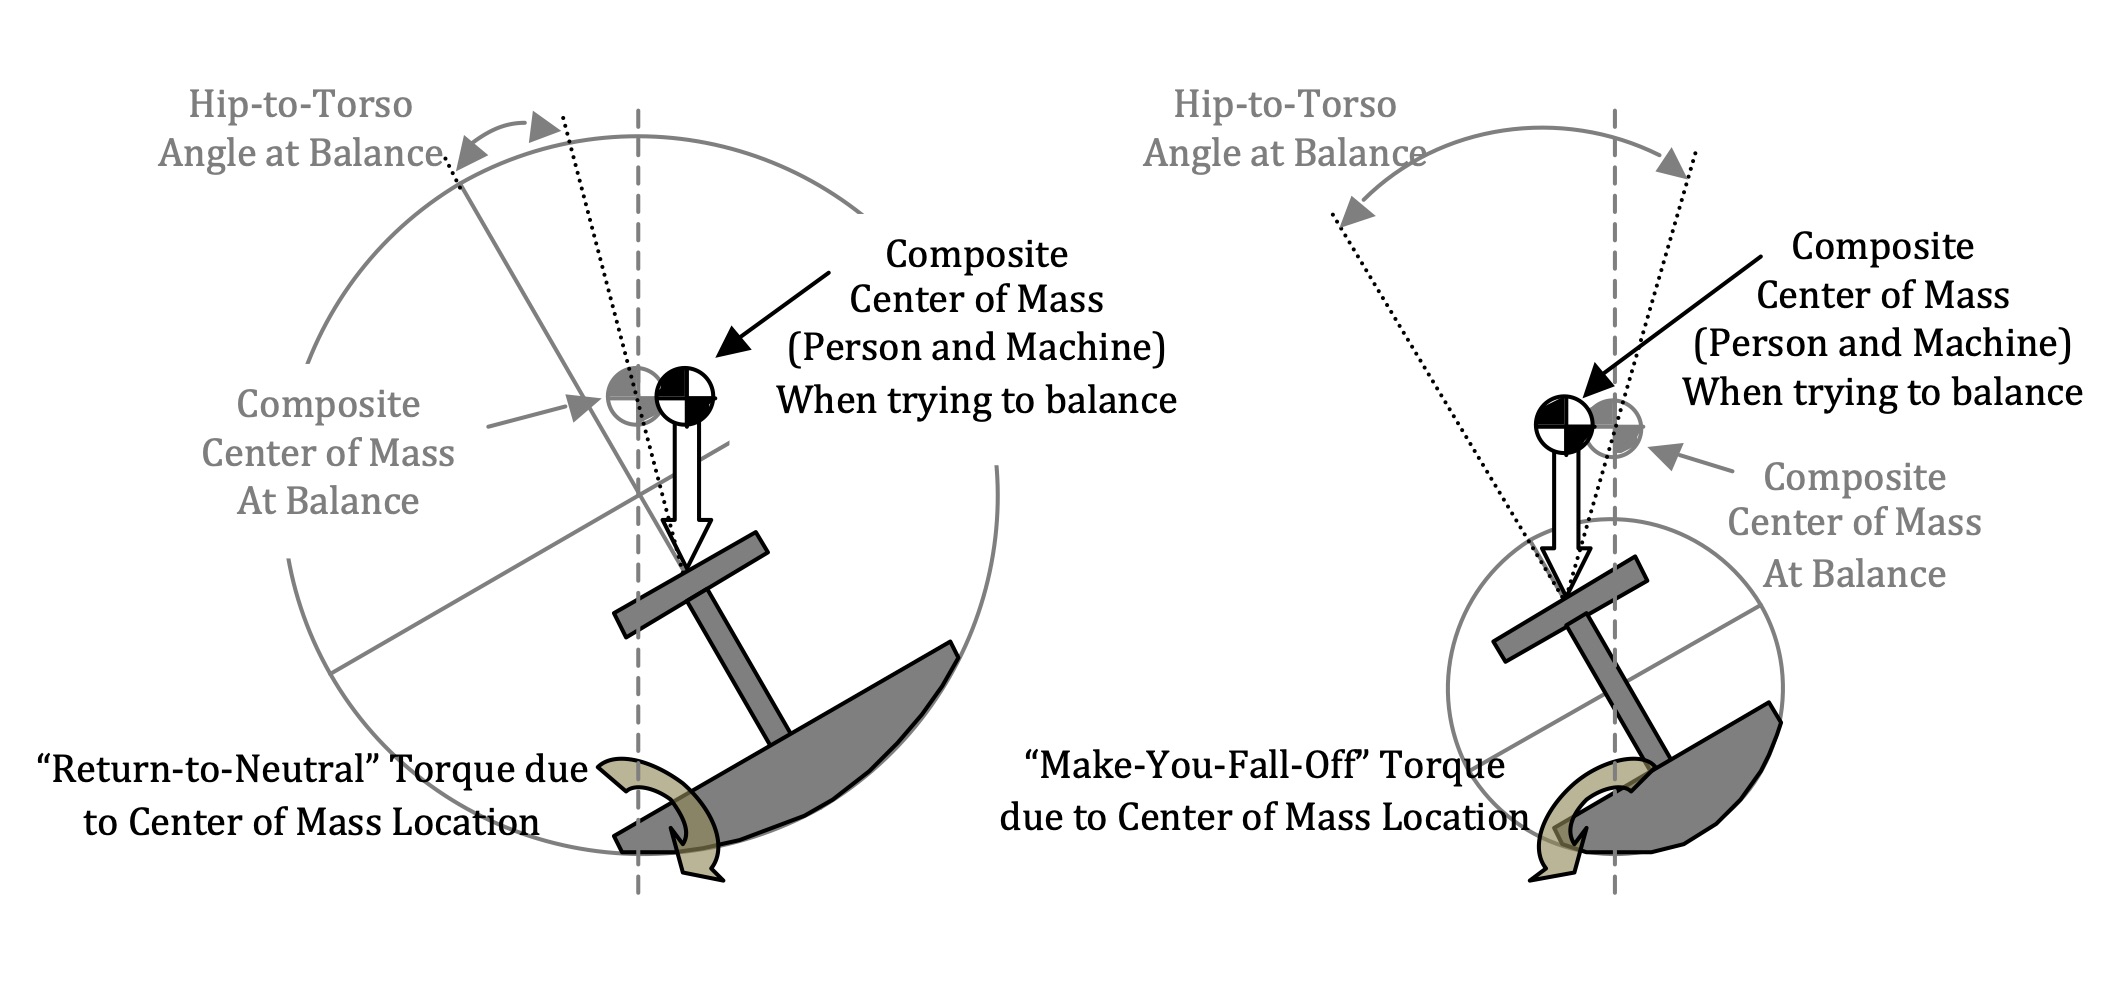
Figure 3: The physics of roll in re metacentric height.
For best stability I recommend a rocker radius of 22” minimum for the current Paddle One and 14 1/8” minimum for the 2002 Paddle One. I’ve added an extra inch and a quarter to the rocker radius for the current Paddle One to keep any quick, large lean recoverable even with the machine’s high center of gravity. These dimensions are derived from the Paddle One’s cross-sectional dimensions as shown in Fig. 4.

Figure 4: Dimensions of the Paddle One that drive rocker radii selection.
Using the dimensions from the figure,


Solving these equations give us the critical rocker radii for the two Paddle One models:


For best stability I recommend a rocker radius of 22” minimum for the current Paddle One and 14 1/8” minimum for the 2002 Paddle One, e.g., a bit larger than the calculated critical radii. I’ve added an extra inch and a quarter to the rocker radius for the current Paddle One to keep any quick, large lean recoverable even with the machine’s high center of gravity.
The rockers themselves consist of 2” x 4” dimensional lumber plus ¼” plywood, sized per the radii defined above and the Paddle One’s frame. The method of assembly is shown in Fig. 5. A fully assembled system is shown in Fig. 6.
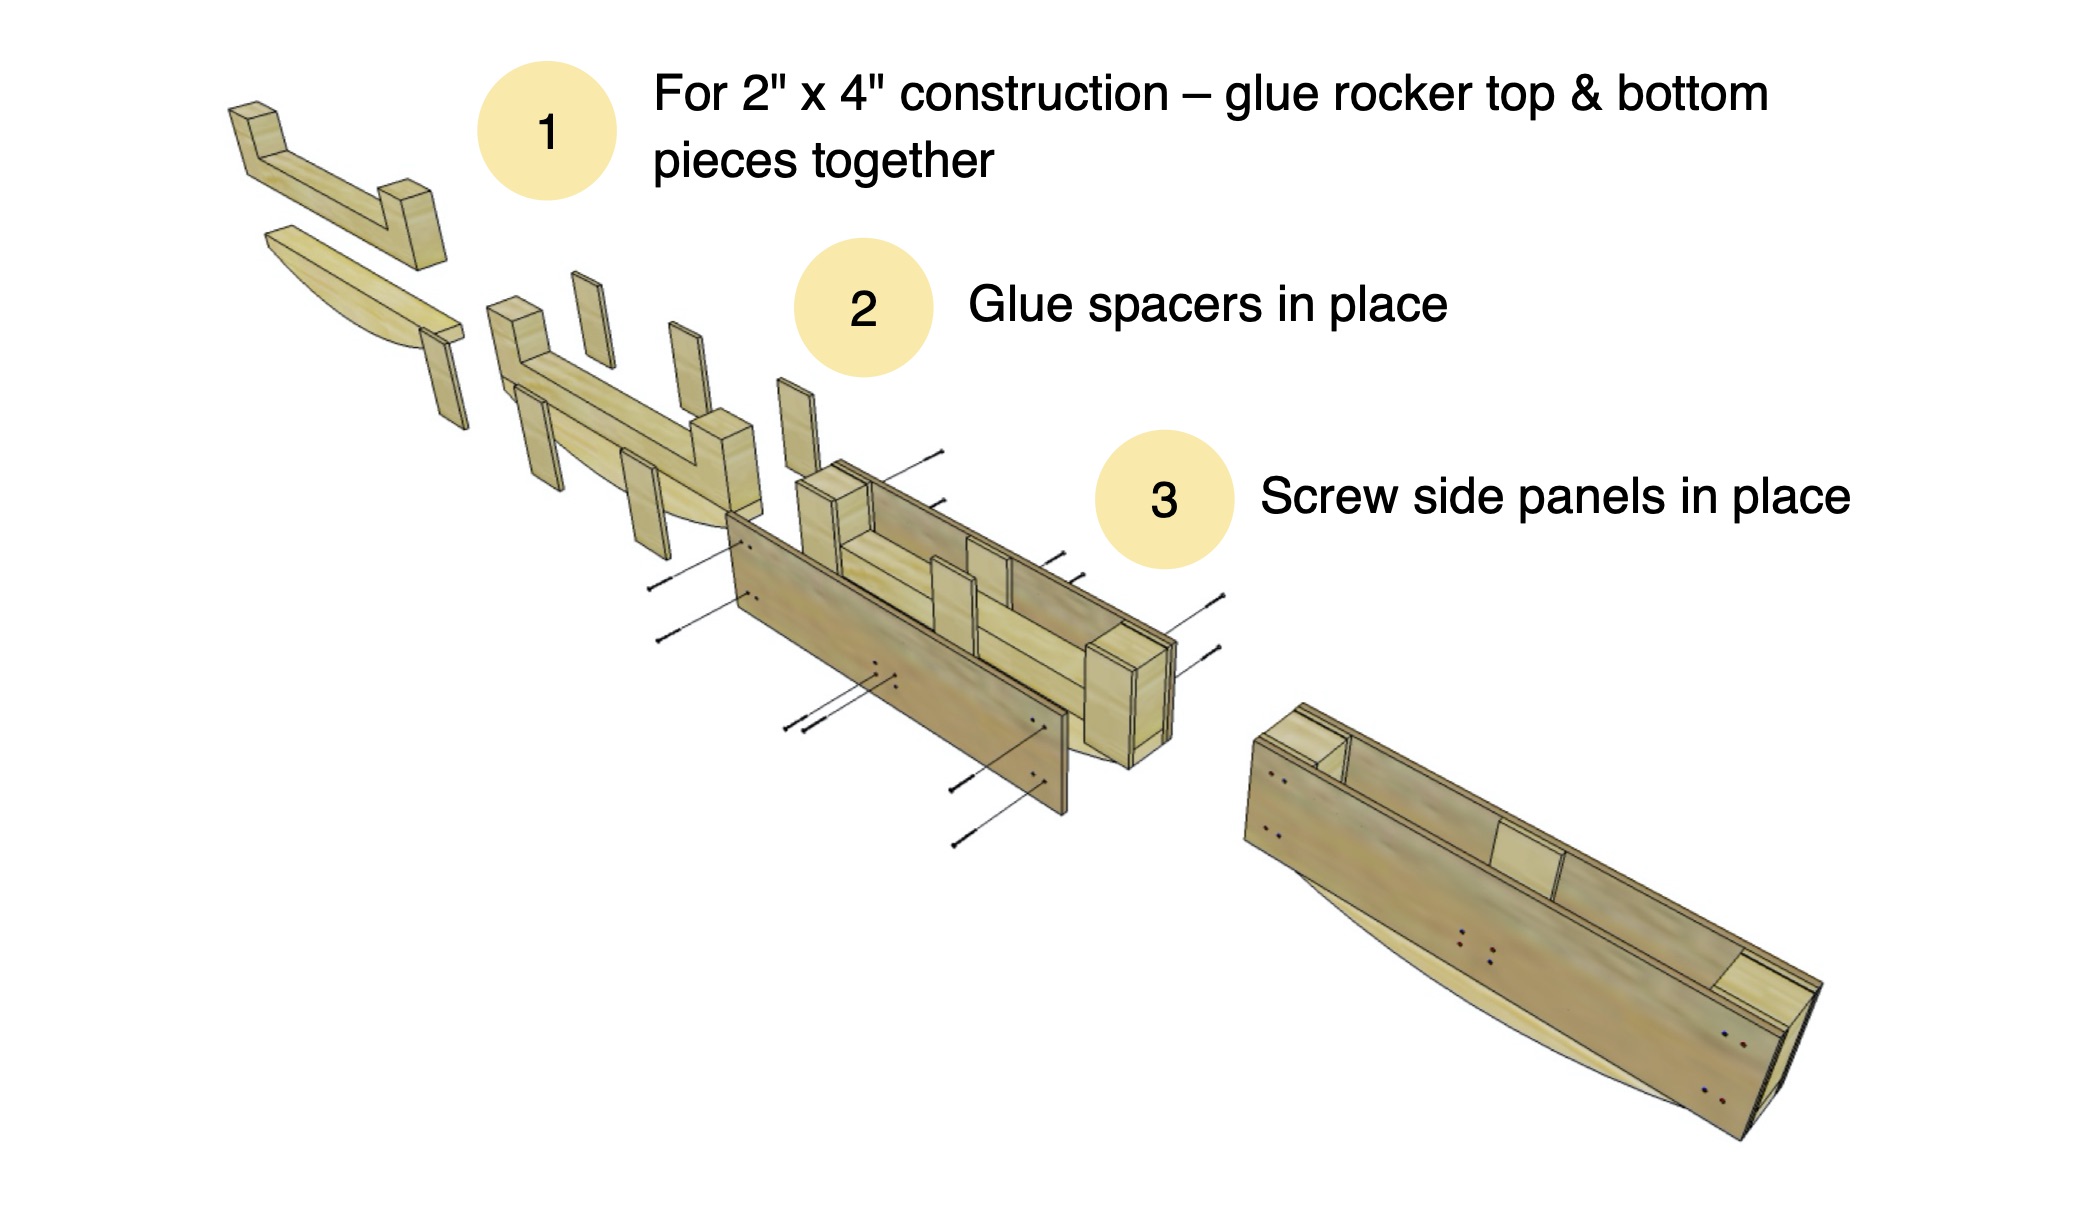
Fig. 5: Adaptor exploded view.
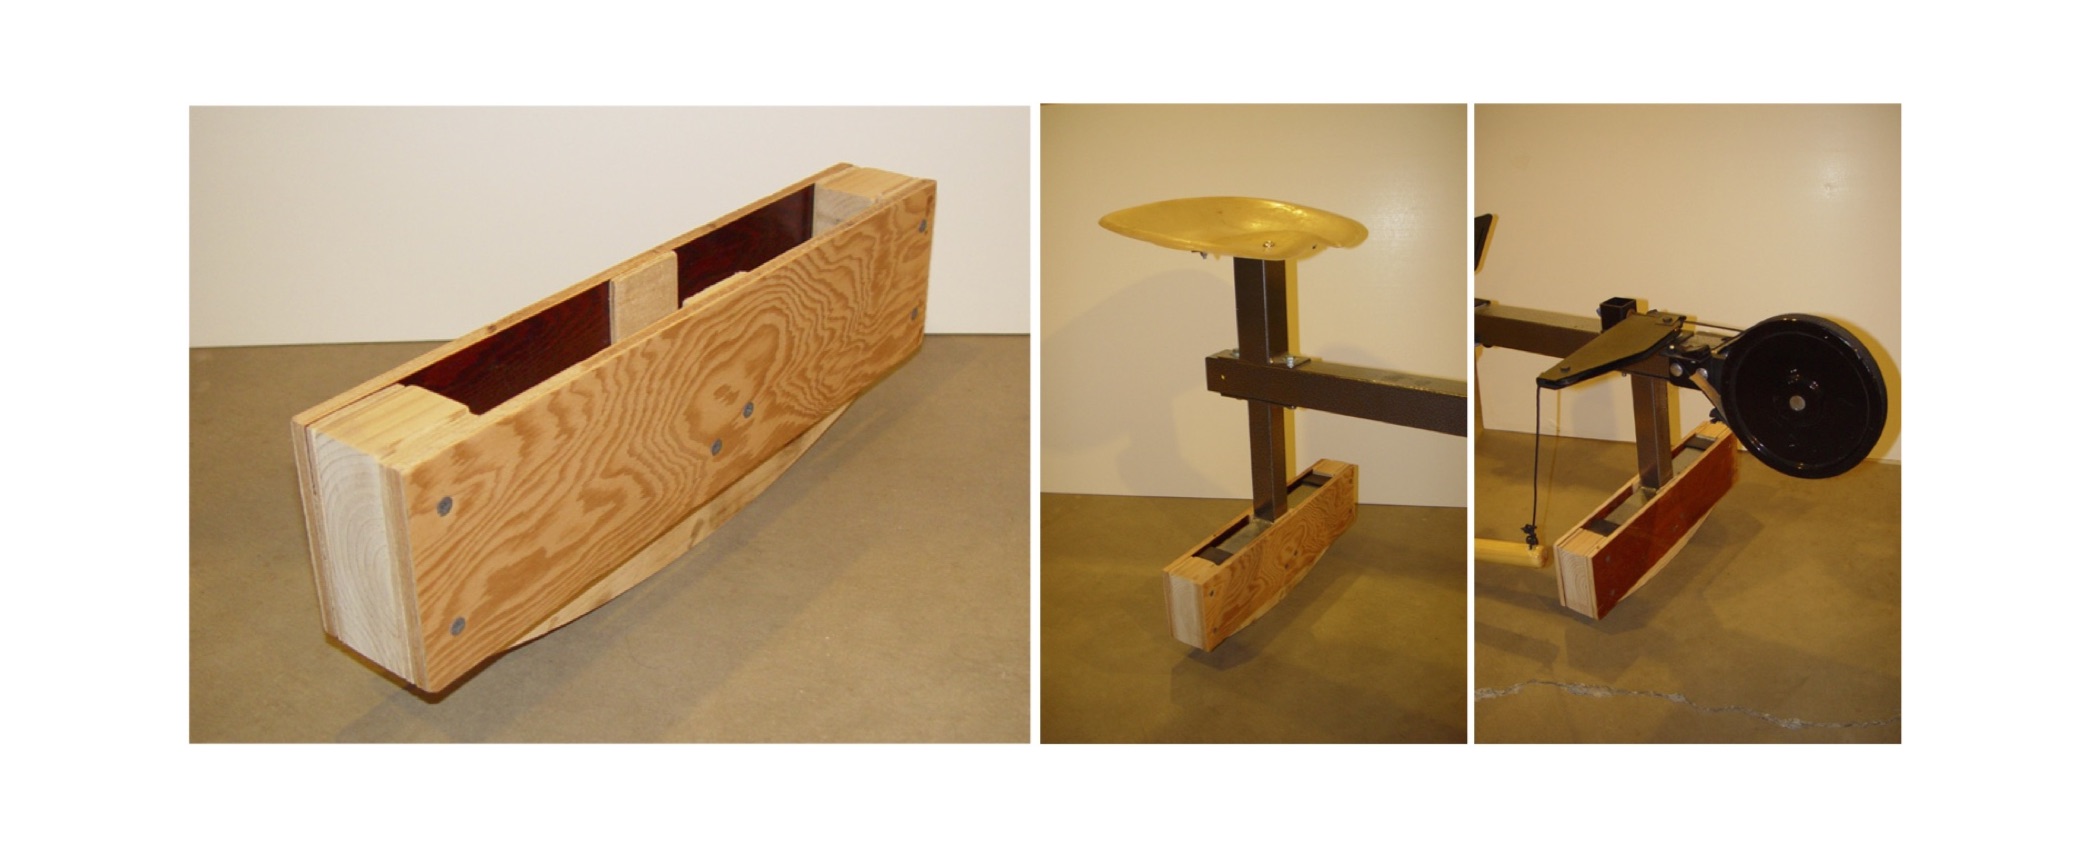
Fig. 6: The final product.
You’re welcome to use these designs for any non-commercial purpose. If you make one, you have the responsibility for the quality and care with which you make it, the care with which you attach the Paddle One to it and the suitability of the whole system for any use to which it is put.
Portions (C) Copyright 2011, Richard Butts, all rights reserved.